Click image to enlarge.
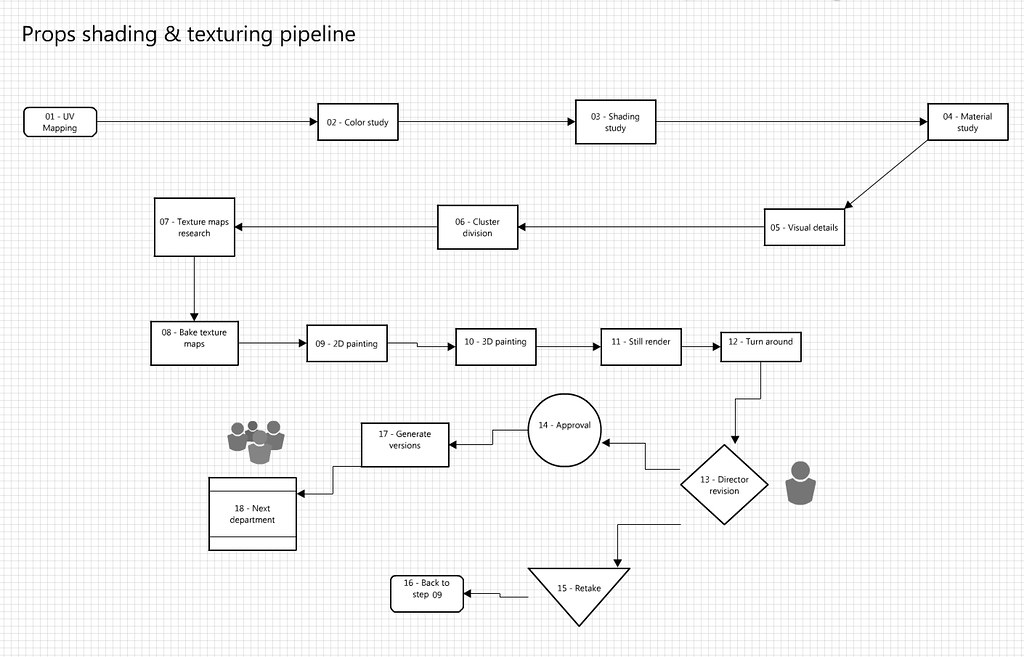
01 - Uv mapping
Execute the mapping of each and all parts that compose the prop.
Try to make the most of the space for the UVs, making sure that all parts of the prop keep the same scale.
Try to group the pieces that share the same material, keeping together, for example, the metals, the woods, plastics with the same color, etc.
Only if the prop is really important and requires an extraordinary detail level, all parts of the prop will share a single UVs set.
02 - Color study
After using a render in gray or ambient occlusion, take the prop to Photoshop and paint over it considering the artistic directions to be followed or the color concepts. Estimate if the color pallette is valid or not and then the Shading Artist propose changes if necessary.
03 - Shading study
Using the neutral lights set, create and configurate the different shaders that will be needed for the prop using also the plain colors and none types of bitmap. Each shader is tested in a sphere and the shaders are saved on their contact sheet. When the prop shaders are created, export a library with the correct nomenclature and save it on the correspondent directory.
04 - Material study
Make a detailed study of the material properties.
Basic questions should be answered such as “what are the differences between this material from others?”.
Follow the document “interview with the texture”.
05 - Visual details
Study the small visual details that will compose the texture maps.
Consider where the scratches will be located, rust, dirt and all kind of details that may compose the prop.
06 - Cluster division
Split the prop in as many material clusters as needed.
This will, it should be created a cluster for each kind of material, perfectly named, with the same nomenclature as the shader related to the cluster.
The result will be clusters for metals, plastics, woods, etc.
07 - Texture maps research
Investigate all the different options of texture maps that will be needed.
You could have bitmaps or procedural maps.
Search or compose both kinds of maps ttat you will be working with. For that you will use the procedures of the different software or texture libraries.
08 - Bake texture maps
Execute bake textures of everying that requires so.
If procedures of other softwares are used, execute the baking as well to have them available at 3D Max.
Also execute bakes of dirt maps, dust maps, procedural maps, IDs, etc.
09 - 2D painting
Paint all the maps needed in Photoshop.
10 - 3D painting
Starting from zero or with the base created on step 9, paint in 3D using Body Paint and/or Mudbox.
11 - Still render
With the shaders and the textures applied, execute a render of a photogram using the neutral lights set with the goal of a visual feedback.
12 - Turn around
Once satisfied with the results, execute a turn around render.
13 - Directors revision
The director approves the results or gives feedback requesting changes.
14 - Approval
The shading and texturing job gets approved.
15 - Retake
Changes are needed based on the director’s suggestions so you should go back to step 09.
17 - Generate versions
Once approved by the Director, create medium and low versions for the texture maps as well as for the geometry.
18 - Next department
Model already texturized for the next department, probably scene composing (to be defined)
--- Spanish version ---
01 - Uv mapping
Realizar el mapeado de cada objeto y todas las partes que componen el prop.
Intentar aprovechar la mayor parte del espacio UV, teniendo en cuenta que todos los objetos han de estar a la misma escala de mapeado.
Intentar en lo posible agrupar las piezas que compartan mismo material, intentando poner juntas, por ejemplo, los metales, maderas, plásticos del mismo color, etc.
A menos que el prop sea realmente importante y requiera un tratamiento de detalle excepcional, todas las partes del prop compartirán un mismo set de UV's.
02 - Color study
Utilizando un render en gris, o con ambient occlusion, llevar el prop a Photoshop y pintar encima considerando las direcciones artísticas. Estimar si la paleta de color funciona o no, y si fuera necesario, proponer cambios.
03 - Shading study
Utilizando el set de luces neutro, crear y configurar los diferentes shaders que serán necesarios para el prop, utilizando solamente colores planos, sin ningún mapa de textura.
Cada shader se prueba en una teapot y se salva un render en su contact sheet.
Una vez creados todos los shaders y con su correcta nomenclatura, se crea una librería con todos ellos y se guarda en su directorio correspondiente.
04 - Material study
Hacer un detallado estudio de las propiedades de los materiales del prop.
Responder a las preguntas básicas del tipo ¿Cuál es la diferencia entre este material y otro?
Seguir el documento "entrevista con la textura".
05 - Visual details
Estudio de los pequeños detalles que componen las texturas.
Considerar donde están las raspaduras, la suciedad, etc.
06 - Cluster division
Dividir el prop en tantos clusters como sea necesario.
Cada material deberá de tener su cluster, perfectamente nombrado.
El resultado serán diferentes clusters para metal, madera, etc.
07 - Texture maps research
Investigar todas las opciones disponibles para mapas de textura.
Pueden ser de tipo bitmap o tipo procedural.
08 - Bake texture maps
Hacer bakes de texturas, procedurales, de tantas cosas como sean necesarias.
Es posible hacer bakes de procedurales de otros softwares para llevarlos a 3D Max.
Dirt maps, dust maps, ID's, etc.
09 - 2D painting
Pintar todos los mapas necesarios en Phooshop.
10 - 3D painting
Empezando de cero, o con una base creada en el paso 09, pintar en 3D utilizando Body Paint / Mudbox.
11 - Still render
Con los shaders y texturas terminados, hacer varios renders utilizando el set de luces neutro.
12 - Turn around
Una vez satisfecho con los renders, hacer un turn around.
13 - Directors revision
El director aprueba el trabajo de shading o pide cambios.
14 - Approval
El trabajo de shading es aprobado.
15 - Retake
Cambios son necesarios, volver al paso 09.
17 - Generate versions
Una vez aprobado por el director, crear versiones medio y baja de las texturas, y shaders.
18 - Next department
El modelo pasa al siguiente departamento.